November 24, 2010

Tear drop earrings *pattern*

I know its been FOREVER since I've posted anything  (crochet related lol)... But now that I've had my baby (who's 3 weeks old already, geez), I'm ready to get back into the swing of things! Being home these past few weeks, I've been trying to come up with some other interesting things to try besides purses and bags... Well my next best friend is jewelery, so I decided to try and start simple by crocheting some earrings... And I'm in love!! I've crocheted about 5 or 6 pairs already, which are all for sale in my etsy shop!


 These are all the one's I've done so far, and trust me there are going to be a lot more to come since they are super easy and quick to make. All u need is some scrap yarn and earring hooks which you can easily find at Michael's, or even Wal-Mart.

I'm gonna start off with the simplest of the bunch for my first earring patttern, and I'll work on writing some other patterns as I go for my next set.  We'll start off with these...


 Pink and Black Tear Drop Earring Pattern
Created by Brittany for CreativeMe!

Any type of yarn will do for this project and you only need about 8-10 inches of yarn for each earring, so its a great way to get rid of all the scrap yarn you may have lying around.

K hook


This pattern is done holding 2 strands of yarn at all times.

With 2 strands, chain 14 ( more or less if u want the earrings bigger or smaller.)
Sl st in the 1st chain and finish off. Get your earring post and slip it in at the top of the earring. Tighten it with some jewelery pliers... and you're done!!!


I'd love to see your finished work, so please feel free to email me pictures so I can feature your work on my blog!


Hope U Enjoy & Happy Crocheting!!

Photobucket


September 3, 2010

We Love Haiti!!! *bookbag pattern*


This is a similar pattern to my son's bookbag pattern that I did earlier this year (Click Here to revisit). My son's a lot bigger now and that bag so doesn't fit anymore lol, so I decided to modify it a little. My son is half Haitian (from his dad's side) and I've been wanting to make something that he could wear to represent his Haitian culture, especially after the earthquake earlier this year. Luckily none of his relatives who are still in Haiti were harmed during that tragic event. The pattern is just for the bag itself, not how to make the bag like the flag. I've included pictures on how I added the white part in to make it a replica of the flag Its not hard to figure out, but I thought it might be a little confusing to try and write it into the pattern. You can use any combination of colors, I just chose to use the colors represented in the Haitian flag...Hope u enjoy!


Haiti still needs plenty of help from the devastating earthquakes. If you're able, join me in donating to help out if you haven't already. Click HERE for donation info.

I used a 5.5 hook for the entire pattern
Created by Brittany for CreativeMe

Pattern
Magic Circle 8 ( if you're unfamiliar with the magic circle method click HERE for a great tutorial)

rnd 1: ch 2, 2 dc in each sp around. Sl St in the ch 2 space.   

rnd 2: ch 2, *1 dc in the nxt sp, 2 dc in the nxt sp* all the way around. sl st in the ch 2 sp (25)

rnd 3: ch 2 * 1 dc in the nxt 3 sp, 2 dc in the nxt sp* 6 times. 1 sc in the last 2 sp. sl st in the ch 2 sp (32)

rnd 4: ch 2, *1 dc in the nxt 4 sp, 2 dc in nxt sp* 6 times. 1 sc in the last 3 sp. sl st in the ch 2 sp. (39)

rnd 5: ch 2, * 1 dc in nxt 5 sp, 2 dc in nxt sp* 6 times. sl st in ch 2 sp (46)

rnd 6: ch 2, *1 dc in the nxt 7 sp, 2 dc in nxt sp* sl st in the ch 2 sp (52)

rnd 7: ch 2, *1 dc in nxt 8 sp, 2 dc in nxt sp* sl st in ch 2 sp (58)

rnd 8: ch 2, *1 dc in nxt 9 sp, 2 dc in nxt sp* sl st in ch 2 sp (64)

rnd 9: ch 2, *1 dc in nxt 10 sp, 2 dc in nxt sp* sl st in ch 2 sp (69)

rnd 10-30: ch 2, 1 sc in ea sc around. sl st in ch 2 sp

rnd 31: *1dc in nxt 3 sp. ch 2, sk 1* all the way around. sl st in ch 2 sp

rnd 32-33: 1 dc in each sp around. sl st in ch 2 sp.

*** For the drawstrings, I braided 6 pieces of yarn together and threaded it through the holes at the top of the bag. I made 2***

***For the straps, for a bigger or smaller child, adjust accordingly. I chained 140 and dc 1 row of red, sc 1 row of white and dc 1 row of blue. I only made 1 strap and sewed it onto the bag.***

*You may sell what you make, but you may not sell my pattern*

This was the start of the white piece in the middle of the bag. I dc 6 rows of white.


This is the view from the inside of the bag. After I had the white piece done and I kept going with the red and blue, once I got to the white part I just stretched the yarn all the way across and kept going with my dc on the opposite side. Hope the pictures helped.


 I'd love to see your finished work, so please feel free to email me pictures so I can feature your work on my blog!    


Hope U Enjoy & Happy Crocheting!!

Photobucket                          


This pattern is featured on:


August 28, 2010

Double Headband w/ Flower *pattern*


I'm trying a different type of headband this time around...Its really simple and will take about 10 mins tops...Hope u all enjoy!
For my latest headband click here


I used a I/9 hook for the actual headband and a G hook for the flower
Created by Brittany for CreativeMe
Headband

Ch 85
start to sc in 2nd ch from hook (sc 16)
once at the 16th sc, start to ch 53 (not sc)
connect back to the original chain and continue to sc to the end. (It should be 16 single crochets on both sides)
                   **I know that may be a little confusing, but the ends should look like this...**


Flower

ch 6. Join with sl st to first ch to make a ring
ch 1, 2 sc in the ring. *ch 4, 3 sc in the ring* 5 times. ch 4, 1 sc in the ring. join with sl st to first sc
sl st in next sc and next ch 4 loop. *1 sc, 1 hdc, 4 dc, 1 hdc, 1sc* in ch 4 loop. Miss the next sc. Sl st i nthe next sc. repeat from * 4 times more and fasten off


*You may sell what you make, but you may not sell my pattern*

I'd love to see your finished work, so please feel free to email me pictures so I can feature your work on my blog!

Hope U Enjoy & Happy Crocheting!!

Photobucket           

May 31, 2010

Bow Ties (*pattern*)


I have a friend who has a really unique sense of style... He wanted me to make him a bowtie, here's what I came up with...

The pattern is really simple, pretty much the same thing as my bows, bows, bows  pattern, just with some minor adjustments...
I chained 45,
hdc in 3rd ch from the hook,
ch 2, hdc across for 7 more rounds.

 I used an 'I' hook for this project.

For the bow center,
ch about 15,
sc across for 3 rounds.


For the strap,
measure the person's neck and chain however many inches you need. Once your chain is complete, hdc across for 2 rnds. I sewed a small button on the back of the bow so the strap can fasten to it.

I'd love to see your finished work, so please feel free to email me pictures so I can feature your work on my blog!

For my latest pattern (a cute knotted heandband) click here
For my latest super easy scarf pattern click here
Both great for last minute gift ideas!

Hope U Enjoy & Happy Crocheting!!

Photobucket           


February 24, 2010

Crochet Wristlet *pattern*


Pattern 
By Brittany for Creative Me
Materials
Hook I
fabric of your choice (optional)
zipper (optional)
needle and thread (optional-for lining of wristlet)
Abbreviations
ch- chain
hdc- half double crochet
fsc- foundation single crochet
sp- space

Ch 28
hdc in 3rd ch from hook
**at the end of row, ch 1 and continue to go around the bottom of the ch with hdc. Once back around to the 1st hdc, ch 2 and continue to hdc around**
***At the end of each row, ch 2 and continue to hdc around. Do this up until round 4***
rnd 4-13: 1 hdc in each st around
****after rnd 13, fsc 28 (for the strap- you may fsc more to fit a bigger wrist)
ch 2, hdc across
when you reach the end of the strap, bring it down and position it at the top of the wristlet. Attach it by doing a series of sl sts to join the strap to the top of the wristlet.

**If you have any problems or questions, feel free to leave it in a comment and check back for my response**

~For personal use only, you may sell what you make, but not the pattern~

I'd love to see your finished work, so please feel free to email me pictures so I can feature your work on my blog!


Hope U Enjoy & Happy Crocheting!!

Photobucket           

February 22, 2010

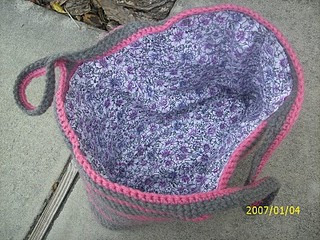
My Crochet Tote *pattern*

This is an original crochet tote design by me. These are one of my favorite types of bags to make, they're really easy too.


Pattern
Created by Brittany for Creative Me

Hook I
Finished size: about 13 inches wide and 11 inches tall (not including straps)
Gauge really isnt important for this project, more of personal preference

Abbreviations
ch- chain
sc- single crochet
rnd(s)- round(s)
nxt-next
sk- skip
st- stitch

Ch 45
rnd 1: sc across starting in 2nd ch from hook
rnd 2: ch 1, turn, sc across

**When you come to the end of a row, ch 2 and sc down the bottom side of the chain**
Keep going until you complete 6 rounds.

rnd 7-8: sc around. When you come to the corners, 3 sc in each of the four corners. (to form the corners of the bag) *only do the corners for rnds 7 & 8 only!!*

rnd 9-40: 1 sc in every st around.

**If you'd like to incorporate stripes in your project do not cut the yarn to add new color. When you're ready to switch colors, make a slip stitch with color 1(grey) then join in color 2 (pink). *Make sure you pull color 1 tightly, then continue to sc around with color 2 until you are ready to change colors again.* Leave color 1 attached (keeping the  ball of yarn inside the bag and out of the way of color 2) as you crochet around with color 2. When you're ready to switch back to color 1, take the yarn from color 1 and bring up to do a slip stitch into color 2. Put the ball of yarn from color 2 inside the bag and continue to sc around with color 1 .** For a better explanation, click here


Try to switch colors at the same spot every time to keep to color change looking neat from the outside of the bag.


rnd 41: 1 sc in the nxt 20 st, ch 50, sk 20. 1 sc in nxt 39 st, ch 50, sk 20, 1 sc in next 18 st.
rnd 42-44: 1 sc in every st around.
finish off
You can also experiment with lining the bag with fabric. You just have to measure the bag, then measure out the right amount of fabric, use pins to hold the fabric in place, and sew!

~For personal use only, you may sell what you make, but not the pattern~


I'd love to see your finished work, so please feel free to email me pictures so I can feature your work on my blog!


Hope U Enjoy & Happy Crocheting!!

Photobucket           

January 30, 2010

Crochet Purse *Pattern*

I've always loved these types of bags, I call them circle bags, but here's my version with a sewn on lining.


Crochet Purse Pattern
Created by Brittany by Creative Me
~For personal use only, you may sell what you make, but not the pattern~

Hook I (5.5mm)        

Abbreviations

MC-magic circle
rnd(s)- round(s)
sc- single crochet
sp- space
trc- triple or treble crochet

**This bag is made in pieces, so be prepared to sew parts together when you're done**

Circles of bags (make 2)
 **work in rounds & use a marker so you'll know where the beginning of the circle starts**
MC 8
rnd 1- 2 sc in ea sp around (16)
rnd 2- *1 sc in nxt 2 sp, 2 sc in nxt sp* (22)
rnd 3- *1 sc in nxt sp, 2 sc in nxt sp* (27)
rnd 4-7-keep working in rounds ( increasing by 1 after every round. ex: you should do 1 sc in nxt 4 sp in rnd 4; 1 sc in nxt 5 sp  in round 5 and so on)-
rnd 8- 1 sc around
rnd 9- *1 sc in nxt 9 sp, 2 sc in nxt sp* sl st in last sp and finish off

Body of Bag
ch 45
rnd 1- hdc in 3rd ch from hook
at the end of each row, ch 2 and hdc across        
continue to rnd 42

Straps (make 2)
ch 76
rnd 1- trc in 4th ch from hook
rnd 2- ch 2, hdc across
rnd 3- ch 3, trc across and finish off

**If you want to sew on a lining, do it before sewing parts of the bag together**

Sewing
Make sure the body of the bag fits around the circleon 1 end, take the circle and sew the body of the bag to it, do the same for the other end and 2nd cirlce.
Sew the straps on any way you'd like, just make sure they're even and the same height on both sides


Hope U Enjoy! I'd love to see your finished work, so please feel free to email me pictures so I can feature your work on my blog!

January 27, 2010

My Son's Bookbag *Pattern*

My son love's the show "Go Diego, Go!"... It seems like he just watches it for Diego's rescue pack, his magical backpack that does any and everything (much like Dora the Explorer), so I decided to make him one. This is my own pattern, and my son loves it. His daycare teachers say he refuses to take it off throughout the day!!
Now that my son is older, I have an updated pattern for a bigger version of this bag here


Hope U Enjoy! I'd love to see your finished work, so please feel free to email me pictures so I can feature your work on my blog!


Bookbag Pattern
Created by Brittany for CreativeMe
~For personal use only, you may sell what you make, but not my pattern~

Hook 5.5mm

Abbreviations

ch- chain
rnd- round
hdc- half double crochet
dc- double crochet
sk- skip
sp- space
sl st- slip stitch
fo- finish off

MC 8
rnd 1- ch 2, 2 dc in ea sp around, sl st in ch 2 sp (16)

rnd 2- ch 2, *1 dc in next sp, 2 dc in next sp* repeat from * to * until end of row is reached, sl st in ch 2 sp(22)

rnd 3- ch 2, *1 dc in next 3 sp, 2 dc in next sp* repeat from * to * until end of row is reached, sl st in ch 2 sp (32)

rnd 4- ch 2, *1 dc in next 4 sp, 2 dc in next sp* repeat from * to * until end of row is reached, sl st in ch 2 sp (39)

rnd 5- ch 2, *1 dc in next 5 sp, 2 dc in next sp* repeat from * to * until end of row is reached, sl st in ch 2 sp (46)

rnd 6- ch 2, * 1 dc in next 6 sp, 2 dc in next sp* repeat from * to * until end of row is reached, sl st in ch  sp

rnd 7- ch 2, * 1 dc in next 7 sp, 2 dc in next sp* repeat from * to * until end of row is reached, sl st in ch sp 

rnd 8-17- ch 2, 1 dc in ea dc around, sl st in ch 2 sp
flaten out; begin from right side at the halfway mark, ch1 and begin to sc to the left sid of bag (about 30 sts across)
ch 1, turn , and continue to sc to other side of bag
turn (do not ch)
put hook in 2nd sp from hook and do sl st
sc 30 across, sl st in last sc, turn
ch 1, sc across (30) sl st in last sc
ch 1, turn, sk 1 and sl st in 2nd sp from hook
sc across (28), sl st in last sc
ch 1, turn, sl st in 2nd sp from hook, sc across (25)
ch 1, turn, sc across (24)
 ch 1, sl st in 2nd sp from hook
 sc 23 across, sl st in last sc
ch 1, turn, sc arocss (23) sl st in last sc
ch 1, sl st in 2nd sp, turn, sc across (22) sl st in last sc
ch 1, turn, sl st in 2nd sp from hook, sc across (19) sl st in last sc
ch 1, turn, sc across (9) ch 5 (for button hole) continue to sc across and fo
**add button of your choice and sew on for closure**


for straps: I chained 95, sc in 2nd ch from hook, ch 2, turn, hdc in 2nd ch from hook, ch 1, sc in 2nd ch from hook. Sew onto bag any way u'd like to and enjoy!!!


Hope U Enjoy & Happy Crocheting!!

Photobucket           

January 20, 2010

Bows, Bows, Bows (*pattern*)

I think bows are a cute add to any accessory. Lately I've been seeing a lot of girls with them on headbands, and decided to try to make my own. They're super easy, really quick and absolutely adorable to wear!


More hair accessory patterns:


The pattern for the headband and bow are super duper easy...


Headband (pink and black stripped)
foundation single crochet (fsc) 48,
ch 1 and turn (if u want to change colors, do it then ch1) if unsure how to do fsc, click here for youtube tutorial
1 dc in each fsc across (48)
(switch back to main color)
ch 1, sc across and finish off

For the bow
hook g

ch 25
rnd 1: ch 2, hdc across (start in 3rd ch from hook)
rnd 2-4: continue to ch 2, hdc across. sew the back of strip together to form a cuff

Center of bow
ch 8
hdc across (start in 3rd ch from hook)
put around the bow and sew in the back to form the bow


For barrettes, you can get clips from any craft store. Just glue them on and let them dry over night! U can make the bigger or smaller by increasing or decreasing the number of chains you do in the beginning of the pattern.


Hope U Enjoy! I'd love to see your finished work, so please feel free to email me pictures so I can feature your work on my blog!